Besides managing a database structures, Liquibase can also load data into an existing table. If there are many rows to insert, the loadData change may be especially useful. It allows to load data from a CSV file to an existing database table. In many cases preconfigured settings are enough to do the job. But it also allows customizations like defining a separator, reordering the columns or even skipping some columns.
Goal - load data from CSV to a database table
Theory is not really needed here. Let's go directly to an example. I have a table USERS created using the following Liquibase change:
<changeSet id="Create table USERS" author="DBA presents">
   <createTable tableName="USERS">
      <column name="US_ID" type="int" autoIncrement="true">
         <constraints nullable="false" primaryKey="true" primaryKeyName="PK_USERS" />
      </column>
      <column name="US_CREATION_DATE" type="datetime" />
      <column name="US_NAME" type="varchar(100)" />
      <column name="US_ACTIVE" type="char(1)" defaultValue="A">
         <constraints nullable="false" />
      </column>
   </createTable>
</changeSet>
It has four columns in total of different data types. Some are nullable and some are not.
The data, that I am going to load into the table are already in a CSV file:
id,creationDate,name,status
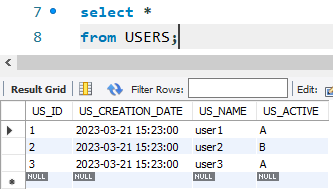
1,2023-03-21 15:23:00,user1,A
2,2023-03-21 15:23:00,user2,B
3,2023-03-21 15:23:00,user3,A
Apparently, the first row contains only headers. There are four of them - like the number of columns. The next three rows contain data - one row in a file reflects one desired row in the table after loading the data. The columns in each row are separated with a comma. That is a quite standard case.
The goal is to import these rows to the USERS table. Finally, there should be three rows in the table.
Load data from CSV to a table
In this simple case, importing data can be done by the loadData change.
<changeSet id="Load data from CSV file" author="DBA presents">
   <loadData tableName="USERS" file="data.csv">
      <column name="US_ID" header="id" />
      <column name="US_CREATION_DATE" header="creationDate" />
      <column name="US_NAME" header="name" />
      <column name="US_ACTIVE" header="status" />
   </loadData>
</changeSet>
The loadData change needs at least two attributes:
- tableName - a name of a database table to which the data should be loaded
- file - a path and a name of the file with the data to import
Then, each column can be configured separately as nested column elements. In the basic version, two attributes make sense:
- name - a name of a table column to which the data will be inserted,
- header - a column header from the file, that points to data, that should be loaded to the database column defined by the name attribute.
When this change set is applied, all three rows are imported to the USERS table.

Skip individual columns
It might be worth to notice, that the US_ID column is a primary key, but what is even more important, it has an auto increment property. It means, that it does not have to be provided in the input file. The database engine should sequentially assign numbers to all inserted rows. We may also go one step further and say, that all imported rows should be active (A), which is the default for the US_ACTIVE column, so why not to skip that column as well?
To test that approach, I slightly modify the CSV file.
creationDate,name
2023-03-21 15:23:00,user1
2023-03-21 15:23:00,user2
2023-03-21 15:23:00,user3
I deleted two columns from the file so only two are left. Now, I have to update the loadData change configuration. I remove the configuration related to both deleted columns as they will not longer be imported.
<changeSet id="Load data from CSV file - skip columns" author="DBA presents">
   <loadData tableName="USERS" file="data.csv">
      <column name="US_CREATION_DATE" header="creationDate" />
      <column name="US_NAME" header="name" />
   </loadData>
</changeSet>
Of course, I clean the USERS table by truncating it (truncate table USERS), to restart from the empty table. I also changes the change set name to a new value, so Liquibase recognizes that change set as a new one and applies it.
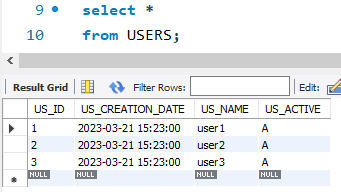
Applying the change set, add three rows to the table. The creation data and the name are imported from the file, but the id and the status are computed by the database engine.

Escape column separator
You may have an impression that the example above is too theoretical and too simple. You may say, that a real life is more complex. And you might be right. But that does not mean, that the loadData change cannot handle the real life cases. For example, a common question at this point is what if my data already contains a comma, which is a separator? Let me show you how to solve it.
Solution 1 - change separator
An easy and a straight forward solution is to change the separator from the default comma to a character, that does not appear normally in your data. Here, I used a pipe character (|) as the separator.
creationDate|name
2023-03-21 15:23:00|user1
2023-03-21 15:23:00|user2
2023-03-21 15:23:00|us,er3
The last user has a comma in the name, which would cause problems, if the comma was still the separator. To change the separator, I use the separator attribute of the loadData change.
<changeSet id="Load data from CSV file" author="DBA presents">
   <loadData tableName="USERS" file="data.csv" separator="|">
      <column name="US_CREATION_DATE" header="creationDate" />
      <column name="US_NAME" header="name" />
   </loadData>
</changeSet>
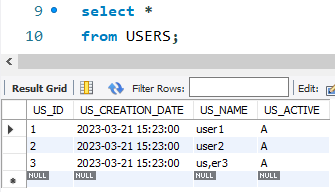
I apply the change set on the database and the user name with a comma is correctly imported.

Solution 2 - quote exact value
Changing the separator is easy, but it does not always work. Sometimes, there is no safe character, that can be used as a separator. You can imagine, that the pipe from the above example is also used in at least one value in the file. In that case, we may use quotes to tell Liquibase, that whatever is inside the quote, it is the exact value that should be imported. Here is an example file, that quotes a value with a comma.
creationDate,name
2023-03-21 15:23:00,user1
2023-03-21 15:23:00,user2
2023-03-21 15:23:00,"us,er3"
Then, I can use the regular configuration of the loadData change.
<changeSet id="Load data from CSV file" author="DBA presents">
   <loadData tableName="USERS" file="data.csv">
      <column name="US_CREATION_DATE" header="creationDate" />
      <column name="US_NAME" header="name" />
   </loadData>
</changeSet>
The data is correctly loaded to the USERS table.
If you need more information, check the loadData documentation.


